I setup a website in WordPress and it sends email fine when I use a Gmail account but messages aren’t sent when I configure it to use my Office 365 account.
If your Office 365 account offers SMTP (usually offered with POP3 and IMAP) you can send WordPress messages through the Office 265 account. Note: Not all Office 365 resellers offer SMTP. One of my accounts is the lowest price Office 365 account that GoDaddy offers and it does not include POP3/IMAP and SMTP. (I’ve tried all of the accounts available directly from Microsoft and all offer SMTP.)
First, create the address in Office 365. It can be associated with a distribution list, a regular mailbox (including a secondary SMTP address), a shared mailbox, or even a mail-enabled public folder.
I recommend using a Distribution list, because Exchange will use the address and display name used in the active directory, not the one set in WordPress. Plus there is no fee for DLs (or shared mailboxes).
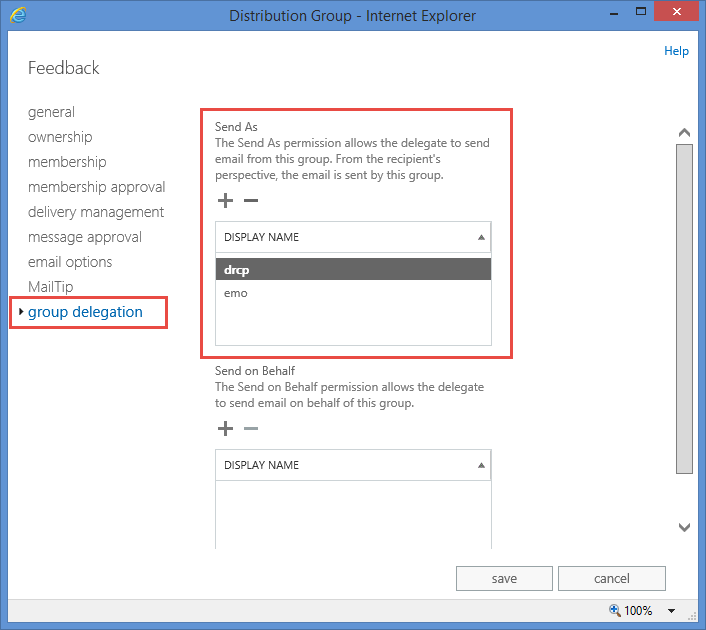
You’ll also need to give your account Send As permission to the DL.
Log into the Exchange admin center at Office 365
- Click Recipients
- To create a distribution list, choose groups.
- Click New (+ icon) and choose Distribution group.
- Enter a display name and alias, such as info, feedback, or webmaster. The messages will use the display name entered here.
- Keep the defaults for the rest of the options.
- Click Save to create the DL.
- Select the newly created DL and click Edit (pencil icon).
- Click group delegation
- Under Send As, click the + sign and select your account.
- Click Save.

Optional: Check the option to hide it from address lists. It keeps the GAL cleaner looking and no one but WordPress should be using this address. On the delivery management page, select Sender inside and outside of my organization. This allows people to reply to the WordPress messages (which will go directly back to your mailbox) so you may want to keep it on the default of only senders inside the organization.
Once Office 365 is configured, you need to get the Configure SMTP WordPress plugin by Scott Reilly. Yes, it’s old and hasn’t been updated in a very long time, but it still works.
Use the following values in the fields. Save and send a test message.
| Field | Value |
|---|---|
| SMTP host: | smtp.office365.com (outlook.office365.com works as well) |
| SMTP Port: | 587 |
| Secure Connection prefix: | TLS |
| Use SMTPauth: | Yes (Checked) |
| SMTP username: | Your Office 365 email address |
| SMTP password: | Your Office 365 account password |
| Wordwrap length: | Leave blank |
| Sender email: | The email address for the DL created earlier. |
| Sender Name: | Exchange will use the display name from the Distribution Group. |
Nice. Thank you.
I used Easy WP SMTP for the plugin as the older one seems to be throwing up lots of php errors for people. It worked like a charm. Thanks for the instructions!
Thanks you so much - just what I needed and worked a treat for me straight away
Hi, I followed the instructions but I got a 405 Not Allowed
You get that in Office 365 or in Word press when you tried to set up the account?
Thanks! It worked great for me.